

No, I’m not an Aggie, but I did go to college at Valley College -Martinsburg, WV.
I heard about TAMU Linux while learning about Linux’s history. How it was the first Linux with a GUI (Graphical User Interface) using the X Window System (X11) under XFree86, an implementation of X11. TAMU stands for Texas A & M University, A & M no longer has a meaning but it originally stood for Agricultural & Mechanical, and serves as a reflection of their past. Very little documentation, that I know of, exists for this particular distribution (for Linux users, they refer to them as distros). This blog documents how much I put in for this system to work, and I never really had this much involvement on a Linux Distro other than adjusting network settings and editing files via text editor.
To start, I did not know what the specifications are. Then, I came across a YouTube video titled Installing Linux Like It's 1992, and used that as a reference point. TAMU Linux originally released in 1992, and their last build was released in 1994. Luckily, most of the components can be emulated via 86Box, and VirtualBox pending on the setting you use. In this case, I’m using 86Box, and the specifications are as follows:
Processor: 386DX at 33Mhz
Memory: 8Mb
Video: Tseng Labs 4000EX at 1Mb video memory
HDD: 2x 234 Mb Hard Drives, one Master and one Slave drive
Sound: SoundBlaster
2x 1.44Mb, 3.5 inch Floppy Drives
1 4x Speed CD-ROM
After getting the disk image files, I ran into my first problem: the disk images were binary files.

Note that this is being done on my Windows PC, so I had to switch to my Linux virtual device and get the files from there. The trick is to use the “dd” command to convert all of the files to floppy disk image (img) files. DD stands for disk/data duplicator and it acts a file conversion command in the Linux Terminal or Command Line. Here is an example of said command: dd if=/home/download/bin.01 of=/home/download/bin01.img. This tells the computer to convert the .01 file to an img file, and it actually worked! I repeated the same process 21 more times, the history makes it convenient to change a number like bin.01 - bin01.img to bin.02 - bin02.img. This started off with the 5.25 inch floppy disk images, and I successfully converted all of them.
Now, it’s time to get things set up. To start, I installed MS-DOS version 5, for emulation purposes. Then, I installed the other partitions: TAMU & Linux Swap. So, you have the following paritions:
/dev/hda1 - MS-DOS, mounted on the /dos directory
/dev/hda2 - TAMU
/dev/hda3 - Linux Swap
/dev/hdb - Extra Storage, Linux Extended Partition
D: a third, unmounted but formatted, Hard Drive for MS-DOS. Make sure you swap the hard drive, and edit the change in the BIOS anytime you switch
Some non-computer users wonder why a Swap Partition is needed? Swap partitions are there to handle demanding tasks and provides stability for Linux. Some users prefer DOS and can have their programs emulated in Linux. The DOS partition is mounted by default by editing a file called “fstab”, not pronounced “f-stab” but “fs-tab” or File Systems TABle. I applied the same thing to the spare hdd labeled /hdb and it’s under /hdb in the root of the entire directory. The root directory is basically the lowest level of your directory or path. So, when someone say “root of the programs folder” or “root of your directory”, you know what it means.
Once I have the basic things out of the way, it’s time to test something out. Read the manual on how to get X11 started. Then, I went over to the X11 folder and set up an Xconfig file by copying the Xconfig.sample file. I typed “xinit” and “startx”, which are commands to manually enable the X Window Display Server. I was met with an error, and it refused to start. So, I had to read up on the XFree86 manual and find out why it didn’t start. The display needed to be configured in the ModeDB Table. Here is what I put down:

Then, I entered “xinit” again, I made progress because the screen blanked out and attempted to start. Unfortunately, it went back to the command line with another error. This error states that it needed the path to the mouse and it couldn’t find it. This is where I had the toughest time, because I did not know where the mouse is. I verified MS-DOS can read the mouse, but not Linux? I looked up how to set up the mouse, and it was under /dev/ttys0, the s0 stands for Serial Port 1, and can also stand for COM1, 3F8. I started it up again, but it completely missed it, which left me confused.
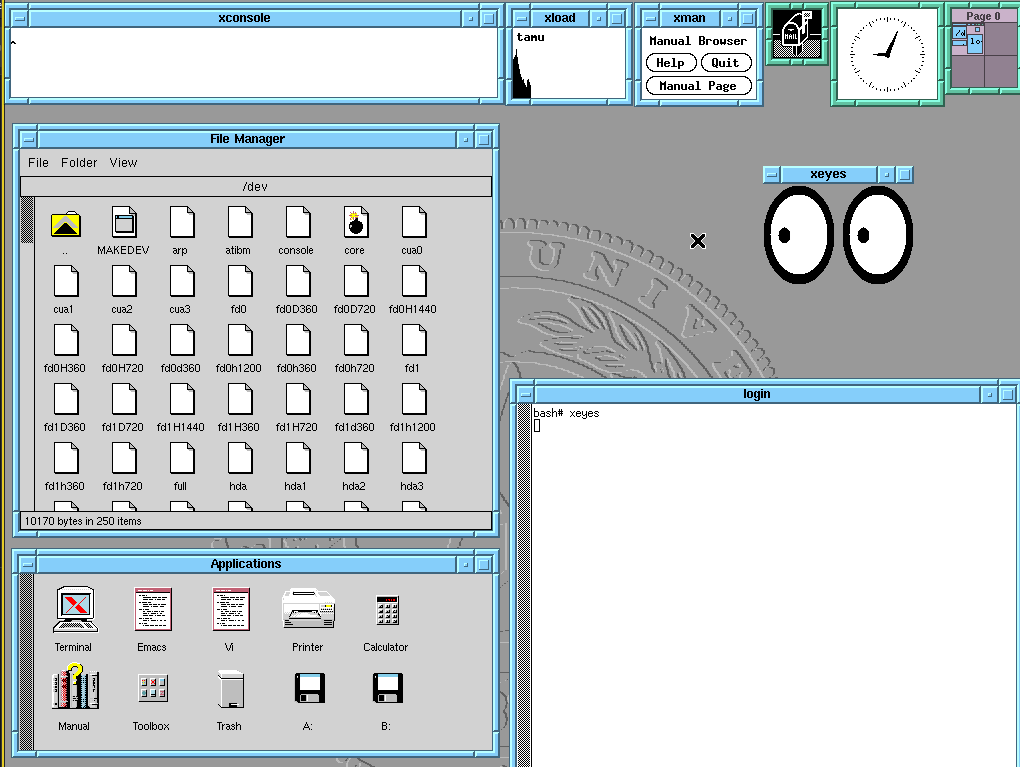
The next thing I did was put in /dev/null and then /dev/console. Both worked, but I had no functioning mouse, and took this screenshot:
Now, it’s time to figure out what exactly I did wrong. After looking at some examples of Xconfig, I realized something… the “s0” was actually “S0”. The capitalized “S” actually makes a HUGE difference, and I made fix, this was the configuration:
I used “setserial” to double-check the BaudRate & Sample rate. The BaudRate measures the communication over a channel, in this case it’s the Serial Port 1. Then, I started "xinit” again and successfully got the mouse to work.
This video is the first clip I recorded for TAMU Linux, with the mouse cursor finally working. You could tell how excited to finally have a working mouse. Then, I ran XTetris, and shared the work to r/Linux post called I revived TAMU Linux.
In conclusion, I have never been this involved in building a Linux from a clean install. I’m used to the installation media, but I had to manually put in the drivers, set the blocks in the hard drive and figure out where I needed to mount partitions at. It’s a learning experience and I like learning new things on stuff I am interested in. Now that I got the basics out of the way, it’s time to customize the build, do some upgrades, patches and install additional but essential programs.
All of that will be on Reviving TAMU Linux, Part 2.